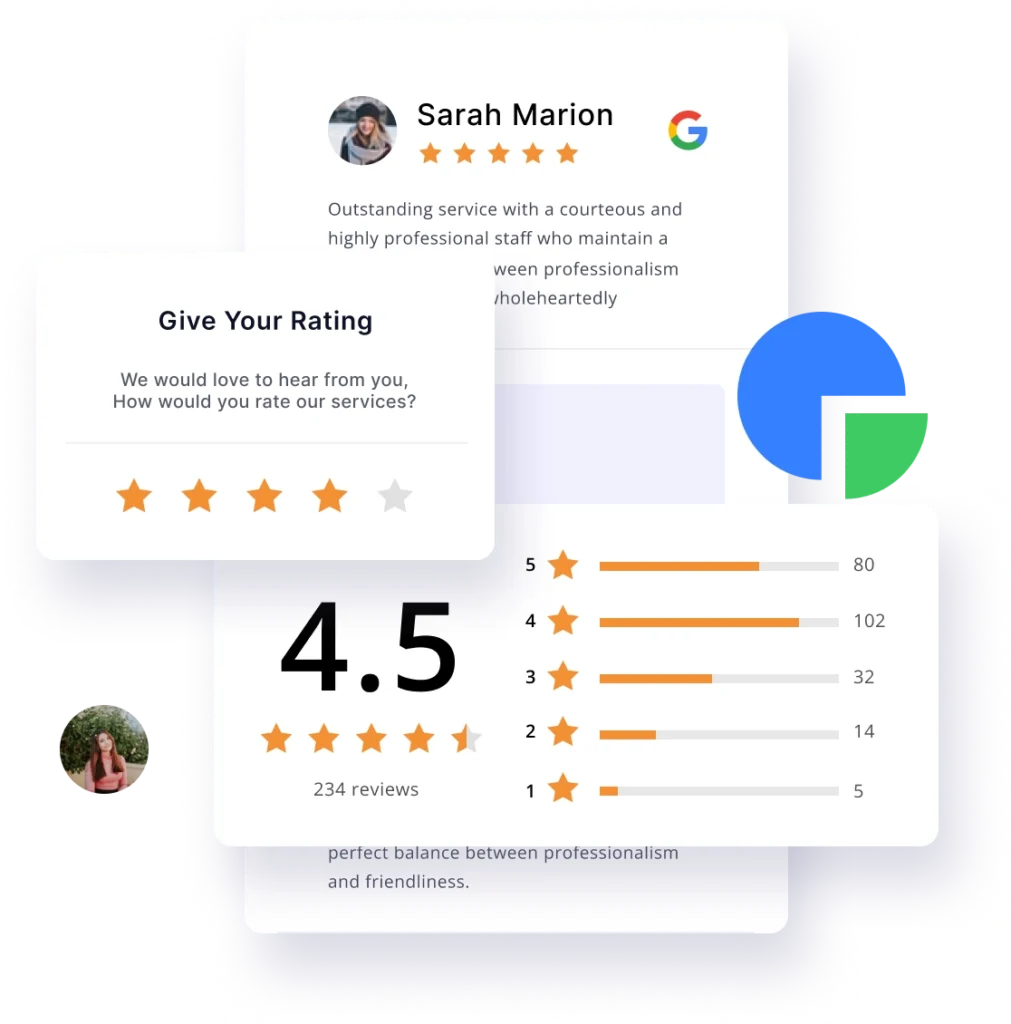
Skyrocket Your Online Reputation
ReviewSync makes it easy to manage all your reviews from one place. Generate new reviews, market and analyse them using our intuitive interface.
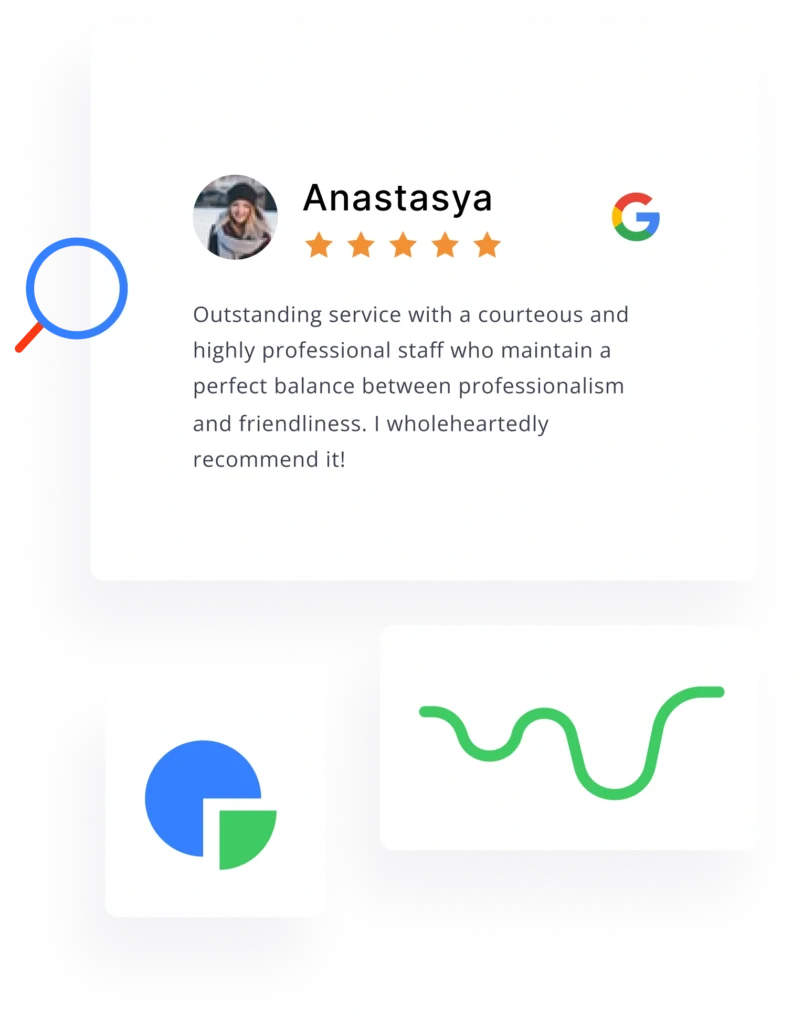
Build trust with review widgets and badges
Using ReviewSync, easily embed our code-free widget on your website and showcase your best reviews to let potential customers know why you’re the right choice for them.
Customize your widget’s appearance to seamlessly align with your brand, and select which of the top review platforms you want to pull your reviews from.
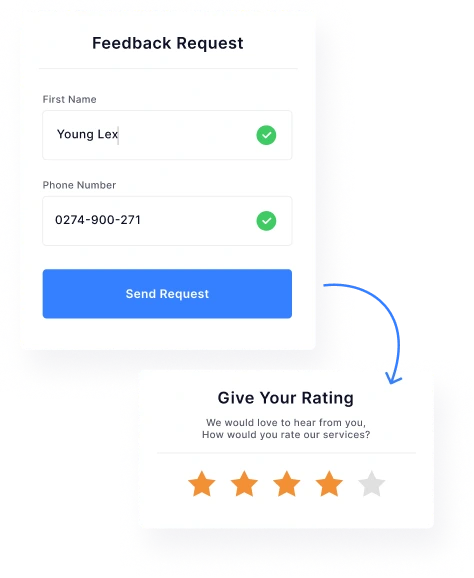
Get new reviews automatically
Your customers are your biggest advocates and the most important marketing tool in your arsenal. Save time by automatically collecting reviews via SMS or email with our review generation software.
Take advantage of ReviewSync‘s complete reviews management solution and generate more meaningful reviews in just a few clicks.

Protect Your Reputation
ReviewSync‘s unique feedback form creates a communication channel between you and your customer, helping you to improve your products and services and build a better customer experience.
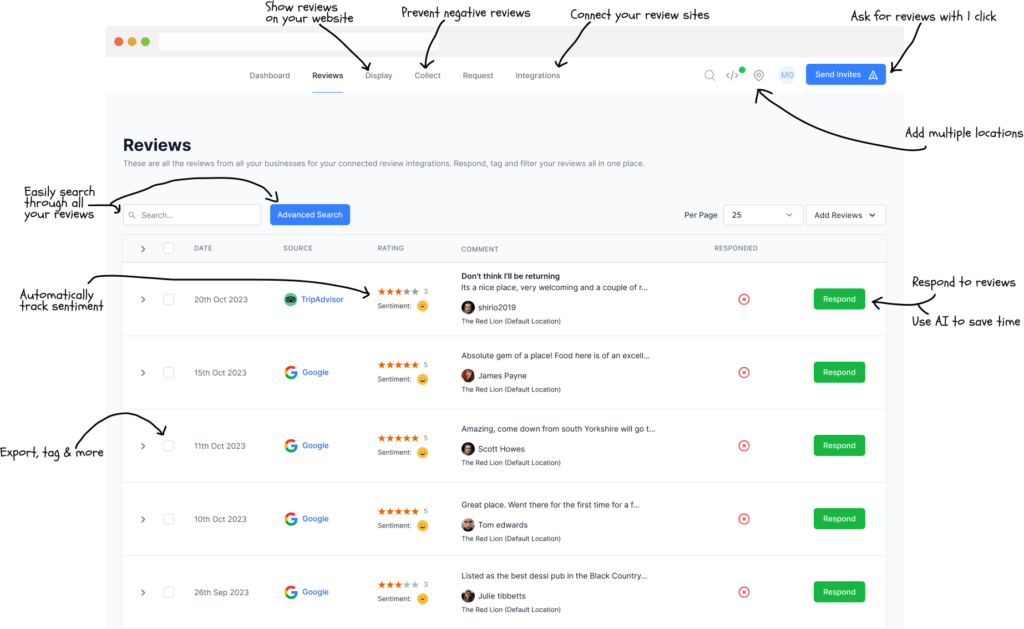
See all your reviews in one place. Get notified every time your business receives a new rating or review so you can quickly respond to any negative feedback and handle it accordingly. With our software, you’ll never miss those critical customer insights again.
All-in-one Review Management Platform
Displaying and requesting reviews for your business has never been easier. Reviews help establish trust, improve brand reputation and SEO, and can significantly boost your sales.
Simple, Transparent Pricing for Smarter Business Growth
Start your 7-day free trial of ReviewSync and manage, generate, and showcase customer reviews with ease — no credit card required.
Starter
Perfect for small businesses just getting started with review management
(Excluding GST)
- Review widget embedding
- Email review requests
- Basic SMS requests
- QR code generation
- Google review collection
Professional
Best for growing businesses that need more features and volume
(Excluding GST)
- Everything in Starter
- AI-powered responses
- Remove branding
- Multiple locations
- Custom CSS styling
- Review analytics
Enterprise
For established businesses with high-volume review management needs
(Excluding GST)
- Everything in Professional
- Auto-respond to reviews
- WhatsApp integration
- Video review requests
- AI Insights
- Search AI
- API access
Need a Custom ReviewSync Plan?
Need something tailored to your business? Customize your ReviewSync plan with flexible features, usage credits and automation options designed around your specific reputation management goals. Contact us to create a plan that fits your needs perfectly.
Getting Started with ReviewSync
Syncing your reviews
Learn how to sync your reviews from Google, Facebook, Yelp, and more.
Step-by-step guides and tutorials
Adding Reviews Manually
In this guide we will go over the steps to create a review manually. You can also upload reviews in bulk by uploading a CSV there is another guide with instructions on how to upload reviews in bulk.
Before getting started
Make sure you have already created a custom source. Each review must be linked to a review source. This is automatically handled when syncing reviews from officially supported review sites but when uploading reviews you have to create a custom source. Follow the below steps on how to create a custom source:
- Go to connect in the top navigation menu
- Click on custom sources (left sidebar)
- Follow the instructions on the page to create your custom source
Creating a review
- Go to reviews in the top navigation menu
- Click on add reviews this can be found above the reviews table on the right side of your screen
- Click add review
- Within the popup you can fill in the information for the review and click add once done
Connecting Multiple Review Sources
If you have multiple review profiles for the same source i.e. Google you can connect them all to your account. For this you will need to create another location within the organization.
How to create a new location:
- Click on settings in the top navigation menu
- Go to organizations (left sidebar)
- Click edit on your organization
- In the create location section type in the name of your location
- Click create
- The system will automatically switch to the newly created location to confirm this see the green label underneath the top navigation menu
- Now click on connect in the top navigation menu
- You can now add another review profile for the same review site
What is a location?
Each organization has atleast one location. This could be a physical location or an online store. The platform supports multi-location businesses so for example if your business is a chain of resaurants it would make sense to create one organization with each restaurant being a location in the system.
You can quickly switch locations by clicking on the location
pin icon in the top navigation menu.
Exporting Reviews
You can export all or a subset of your reviews from the platform by following the below steps.
- Go to reviews in the top navigation menu
- If you want to export all reviews select the very top checkbox in the reviews table. But if you want to export only specific subset of reviews use the advanced search option and filter the reviews you require and the click the top checkbox
- If multiple pages of reviews are found that match your filters then you will see something similar to this:
- Click select all if you want to export all reviews that match your filters or just want the current page of reviews shown
- Now above the table you will now see a bulk action dropdown click on this and click export
- The system will now start exporting the reviews to a CSV file and you will receive an email with the file once it’s finished exporting
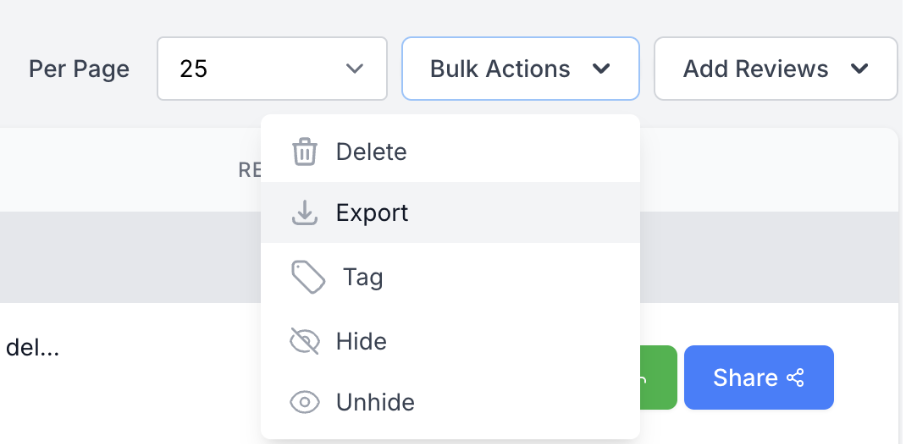
Hiding Reviews
If you have some specific reviews that you want to be hidden from your widgets and social media images you can mark them hidden. We don’t recommend deleting reviews from the platform as their is always a chance they will reappear when we re-sync your reviews from the review source.
To hide a review, follow the below steps:
- Go to reviews by clicking on the menu link in the top navigation
- Select the review(s) you would like to hide
- Now click on the bulk actions option above the review table
- Click hide
- Confirm that you would like to hide the selected review(s)
- Once the review is hidden it will still be shown within the reviews table but will be disabled with a hidden table but it won’t be visible in any public widgets or social images going forward
How to unhide a review?
You can follow the same steps as above and just select unhide instead of hide (step 4).
How To Add Testimonials
In this guide we will go over the steps required to enable testimonial collection and additional options.
Enable testimonials
- Go to connect in the top navigation menu
- Search for testimonials
- Click connect
- Once the popup is shown click connect again
Collecting testimonials
Once you enable testimonials you will be automatically redirected to the feedback forms page. If this is the case you can ignore step 1 and 2 and go straight to step 3.
- Go to get more reviews in the top navigation menu
- Click on feedback forms (left sidebar)
- Click edit on the feedback form or create a new form if you don’t have one yet
- Under the settings tab switch on Testimonial
- Once enabled you will now have a new tab called testimonial click on this tab to adjust the widget
Changing the testimonial logo
Before getting started with the below steps make sure you have created a custom source and upload logo. Custom sources can be created by going to connect (top navigation) and then click on custom sources.
- Go to get more reviews in the top navigation menu
- Click on feedback forms (left sidebar)
- Click edit on the feedback form
- Click on the testimonial tab
- On the custom source dropdown select the custom source you would like to use.
How To Connect to A Review Source
The first thing you need to do is connect to a review source. This is the source that we will sync reviews from. In this guide we will go over the steps to connect to a review source.
Setup Guide
- Click on connect in the top navigation
- Search for the review source you would like to connect to
- Click connect
- Follow the on-screen instructions to connect to the review source
- Once connected we will start syncing reviews from the source this can take a few minutes depending on the number of reviews
How often do we sync reviews?
Each review source has it’s own schedule for syncing reviews. Some review sources allow us to sync reviews in real-time while others only allow us to sync reviews once per day. You can find the sync schedule for each review source by clicking more info on the specific review source once connected.
We recommend that you use the sign-in option whenever it’s available as this will allow us to sync reviews in near real-time.
What happens if my sync fails?
If your sync fails when you connect the review source we will automatically retry the sync based on intervals. If the sync continues to fail we will send you an email notification and mark the review source as failed. Please double check the URL you provided and try again. If you continue to have issues please contact us.
How To Sync Reviews from Google
When syncing your reviews from Google you have two options. In this guide we will go over the two options and our recommended approach.
Grant Access (Recommended)
The grant access method is the recommended approach and will allow you to reply to your Google reviews directly via the dashboard. Follow the below steps to get started with this method:
- Click on connect in the top navigation menu
- Search for Google on the Sources page
- Click connect and wait for the popup to appear
- Make sure the grant access tab is selected inside the popup
- Click on the Sign in with Google button
- You will now be redirected to Google to grant the platform access to sync your reviews.
- Once you have approved access you will be redirected back to the platform from where you can select the GMB listing that you would like to sync.
- Once you have connected your listing, we will start syncing your reviews this usually takes a few minutes.
Public Access (If you cannot login to Google)
This method should only be used if you cannot login via Google.
- Click on connect in the top navigation menu
- Search for Google on the Sources page
- Click connect and wait for the popup to appear
- Click on the public access tab
- In the business name field type in the name of your business and select the business from the dropdown
Note: It is important that you select the business from the dropdown otherwise we will not be able to sync your reviews when using the public access method.
How To Upload Reviews Manually
You can import reviews into the system via CSV we don’t have a particular format requirement as you will be able to map the columns when importing the reviews. This option is useful for those who need to import old reviews from a system we don’t automatically sync reviews from this could be your website or another source.
To get started with the import we must first setup a custom source so you will need a logo for this custom source (it will be used within the social proof widgets and social images).
Step 1: Importing Reviews
- Click on reviews in the top navigation
- Click the add reviews dropdown
- Click import reviews from the dropdown
- Select your CSV file
- Click import
- Now map the columns in your CSV file to the correct fields
- Click import
- Great! Your reviews will now be imported
Step 2: Updating custom source logo
- Click on connect in the top navigation
- Click on custom sources in the left sidebar
- Click edit on the imported custom source
- Add the domain for the source (required)
- Upload a logo for the source (required)
- Click save
Tagging Reviews
You can assign tags to your reviews to organize them better or use tags to only show specific reviews within a widget. Follow the below steps to tag your reviews:
- Go to reviews in the top navigation menu
- If you want to tag all reviews select the very top checkbox in the reviews table. But if you want to tag only specific subset of reviews use the advanced search option and filter the reviews you require and the click the top checkbox
- If multiple pages of reviews are found that match your filters then you will see something similar to this:
- Click select all if you want to tag all reviews that match your filters or just want the current page of reviews shown
- Now above the table you will now see a bulk action dropdown click on this and click tag
- In the update tag popup you can enter the tags you would like to attach to the reviews
Displaying your reviews on your website
Learn how to display your reviews on your website.
Step-by-step guides and tutorials
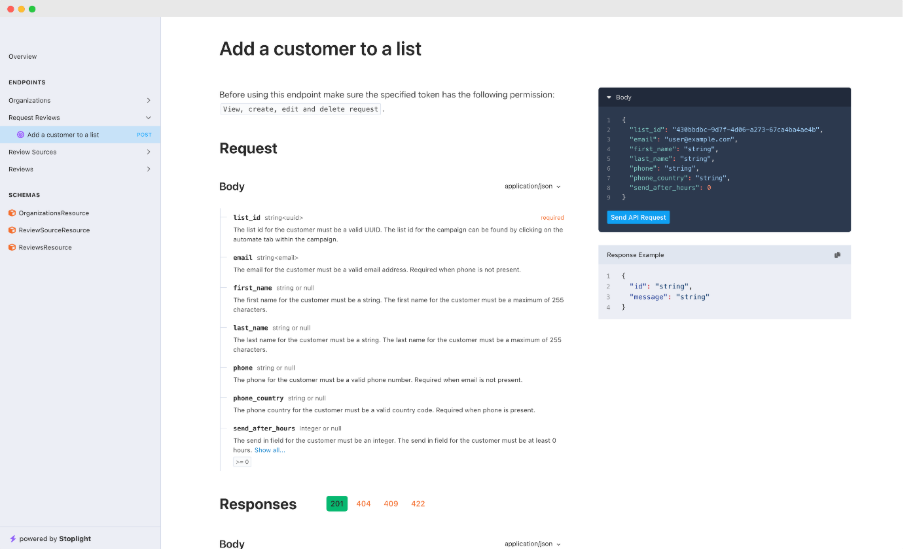
Fetch Reviews Via The API
If you have the technical expertise within your team, you can use the API to fetch all your reviews into your own system. In this guide we will go over the steps required to use the API.
Step 1: Create Access Token
Before using this endpoint you need to create an access token with the correct permissions. Follow the below instructions to get an access token:
- Go to settings in the top navigation
- Click on Api & Webhooks
- Under create API token give your token a name
- Select the View reviews permission
- Click create
- Copy the generated token and store this somewhere for later use
Step 2: Making Your API Request
Our API can be used with most platforms including automation tools like Zapier, Pabbly as well as most third-party systems that support REST API support. Click here to access the API documentation for this endpoint.
How To Create Your First Widget
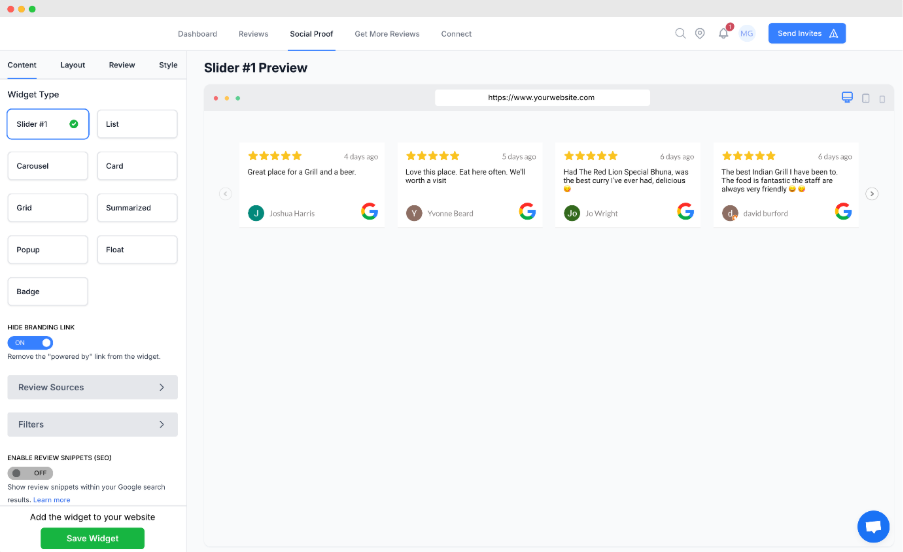
We have a number of widgets you can embed into your website. It normally takes a few minutes and requires little to no technical experience.
Follow the below steps to setup your first widget. There are many options to customise the widgets to your liking. In this guide we will go over the basics but feel free to experiment.
- Go to social proof in the top navigation menu
- Click the create widget button
- Give your widget a name
- Click next
- Under the widget type you will find the different widget styles click through them to find a widget style you like
- Once you have selected a design you like click save widget
- Within the popup click the installation steps button
- Click the copy to clipboard button
- Paste the copied code into your website
How To Show Reviews from Multiple Locations
Our widget builder supports the ability to show reviews from multiple locations within an organization. By default, reviews are shown from the current location but if you want to include additional locations then follow the below steps to enable this:
- Go to social proof in the top navigation menu
- Click edit on the widget you would like to enable this option on
- Under the content tab click on the filters option
- Scroll down to the include additional locations option and select the locations you would like to include
- Once you are happy with the changes click save
Note: If you have already installed the widget on your site, you do not need to reinstall the widget as the settings will be synced across automatically.
Displaying your reviews on your social media
Learn how to display your reviews on your social media.
Step-by-step guides and tutorials
Creating Your First Social Media Image
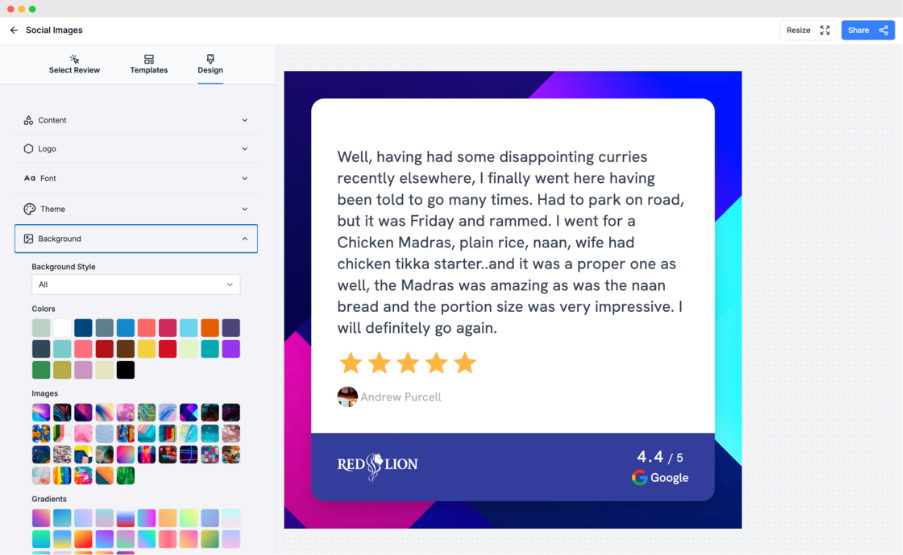
You can create beautiful social proof by using our built-in easy to use social media image designer. To get started follow the below steps:
- Click on reviews in the top navigation menu
- Search for the review you would like to share (note: you can also use the advanced search button to filter reviews by rating and other parameters)
- Click the share button on the review
- Within the social image designer select the base template you like
- Click on the design tab to customize your design
- Once you are happy with your design you can click the share button in the top right of the designer and export to either PNG or JPEG (either will work for most social media platforms)
How to upload a custom background?
You can upload a custom background by clicking on the design tab within the designer and then under background style select image. You will see the upload option to insert your own images.
How to add your business logo to the image?
You can upload your business logo to the social media image by clicking on the design tab within the designer and then under logo you will have the option to upload your own logo into the image.
How to resize the image?
Within the designer in the top right Corder you can click on the resize button and select the social media platform that you would like to post to. You can then select from the predefined sizes for those platforms on provide a custom size if you prefer.
How to get more reviews
Learn how to get more reviews on autopilot. Prevent negative reviews from impacting your business and more.
Step-by-step guides and tutorials
Automate Email Review Requests By BCC
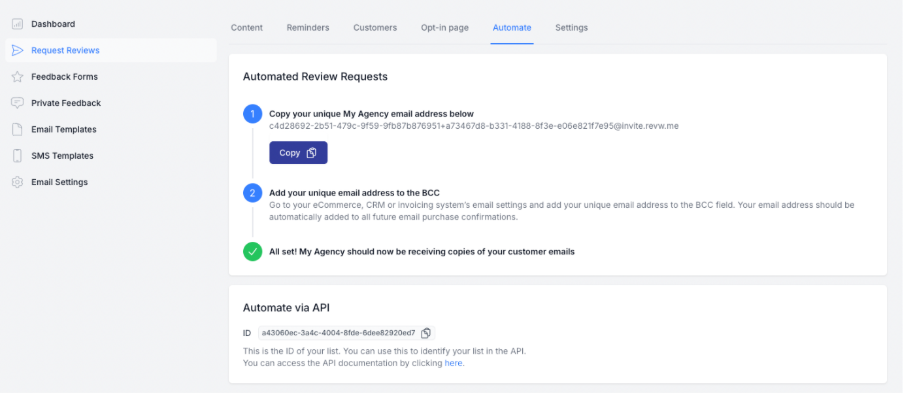
You can automate the process of adding customers to your email review request campaigns by emailing a special unique email address. In this guide we will go over the steps on how to set this up.
Steps to setup:
- Click on the get more reviews navigation link in the top menu
- Click on request reviews (left sidebar)
- Click edit on your email review request campaign
- Click on the automate tab
- Click the copy button to copy the unique email address to your clipboard
- Go to your eCommerce, CRM or invoicing system’s email settings and add your unique email address to the BCC field. Your email address should be automatically added to all future email purchase confirmations.
Email Privacy:
The platform only reads the to address field from the email and does not parse/process any of the email content. Our platform is fully GDPR compliant and does not store any information when you use this method.
Automate Review Requests Via The API
In this guide we will go over the steps on how to use our API to send review requests. It may be easier to use the BCC method but if you cannot use this or want to automate SMS review requests then the API is a good choice.
Step 1: Create Access Token
Before you can send any requests to the API you must first generate a valid API token with the right permissions.
- Go to settings in the top navigation
- Click on Api & Webhooks
- Under create API token give your token a name
- Select the View, create, edit and delete request permission
- Click create
- Copy the generated token and store this somewhere for later use
Step 2: Get Your Campaign ID
When sending review requests via the API you need to let the API know what campaign you want the review request to be sent from. Follow the below steps to get the ID for the campaign.
- Go to get more reviews in the top navigation menu
- Click on request reviews (left sidebar)
- Click edit on the email or SMS campaign that you want to automate
- Click on the automate tab
- Under the automate via API section copy the ID to your clipboard and store this for later use
Step 3: Making Your First API Request
Our API can be used with most platforms including automation tools like Zapier and Pabbly. Click here to access the API documentation for this endpoint.
Display Feedback form On Your Website
If you would like to display your feedback form on your website i.e. an order confirmation page then follows the below steps to get the installation code for the widget:
- Go to get more reviews in the top navigation menu
- Click on feedback forms (left sidebar)
- Click on the install button on the feedback form you wish to install on your site
- Scroll down to the widget install section
- Click copy to clipboard or Email someone who can install the code onto your site
Note: The installation steps are the same with the social proof widgets and work exactly the same with feedback forms so head over to that section if you want to learn more.
How To Delay Review Requests
You can configure review request campaigns to automatically add a delay when a customer has been added to the system. Follow the below steps to setup a time delay.
Setup a default delay on the campaign
- Go to get more reviews in the top navigation menu
- Click on request reviews (left sidebar)
- Click edit on the campaign you want to add a delay to
- Click the settings tab
- Under the schedule section go to the send in field and the number of hours you would like to delay the review request by
- Click save
Delay a specific review request
You can delay individual review requests via the send invites button in the top menu by switching off the send now button and entering the hours you would like to delay the request by. This option is also available within the API (please see API documentation for details).
How To Download QR Codes
QR codes are attached to your feedback forms. Feedback forms are a powerful way to get more reviews instead of just sending your customers directly to a review site to leave a review. You can prevent negative feedback, automatically detect if customers have native apps like Google maps installed on their mobile device and open that instead of your customers having to sign-in again to leave review plus much more.
To download a QR code for your feedback form follow the below steps:
- Go to get more reviews in the top navigation menu
- Click on feedback forms (left sidebar)
- Click install on the feedback form you want to download the QR code for
- Click download on the QR code
Tracking QR code referrals:
You can assign unique QR codes to an employee or location. QR code referrals is a powerful way to gain insights on who or what is generating you the most reviews. On the installation page go to the referrers section and click add referrer to get started. Referrer statistics are shown on your dashboard.
How To Get More Reviews (Email)
Getting more reviews is critical to build trust with potential new customers but this is also a key indicator with local rankings. Review recency also plays a big role in how search engines like Google rank businesses when your customers make a search.
In this guide we will go over the steps on how you can get more reviews on a regular basis from your customers without having to sacrifice your time so you can focus on your core business.
To get started with email review requests follow the below steps
- Click on get more reviews in the top navigation
- Click on request reviews (left sidebar)
- Click create campaign
- Enter a name for your campaign
- Make sure the type is set to email
- Optionally select a template (otherwise a blank template will be used that you can customize)
- Click create
- Type in the subject of the email
- You can now customize the email template inside the email editor
- Once you are happy with the email click Save and Send Test
- Type in an email to send a test review request to
- Check your inbox and make sure the email looks good
Once you are happy with the email you can now send the campaign to your customers. To do this follow the below steps:
- Click on settings tab inside the campaign
- Adjust the times you want the campaign to be sent out (currently times are UTC)
- Uncheck the paused campaign option
- Optionally decide if you want us to automatically add a delay before we send the review request when a customer is added to the list
- Click save
- Great! Your campaign will now be sent out to your customers based on the schedule you set and the delay you set
How To View Credit Usage
When sending review requests there is a credit cost associated with each request. You can view your credit usage by following the below steps:
- Click on settings in the top navigation
- Click on credits (left sidebar)
- You will now see your credit usage overtime and the total credits remaining
Purchasing Additional Credits
If you need additional credits then what your plan supports you can either upgrade or click on the buy credits link in the left sidebar and purchase some non-expiring credits.
How To Get More Reviews (SMS)
Getting more reviews is critical to build trust with potential new customers but this is also a key indicator with local rankings. Review recency also plays a big role in how search engines like Google rank businesses when your customers make a search.
In this guide we will go over the steps on how you can get more reviews on a regular basis from your customers without having to sacrifice your time so you can focus on your core business.
To get started with SMS review requests follow the below steps
- Click on get more reviews in the top navigation
- Click on request reviews (left sidebar)
- Click on the SMS tab
- Click create campaign
- Enter a name for your campaign
- Make sure the type is set to SMS
- Optionally select a template (otherwise a blank template will be used that you can customize)
- Click create
- You can now enter the SMS message that should be sent to your customers
- Once you are happy with the SMS click save
Once you are happy with the SMS you can now send the campaign to your customers. To do this follow the below steps:
- Click on settings tab inside the campaign
- Adjust the times you want the campaign to be sent out (currently times are UTC)
- Uncheck the paused campaign option
- Optionally decide if you want us to automatically add a delay before we send the review request when a customer is added to the list
- Click save
- Great! Your campaign will now be sent out to your customers based on the schedule you set and the delay you set
How To View Credit Usage
When sending review requests there is a credit cost associated with each request. You can view your credit usage by following the below steps:
- Click on settings in the top navigation
- Click on credits (left sidebar)
- You will now see your credit usage overtime and the total credits remaining
Purchasing Additional Credits
If you need additional credits then what your plan supports you can either upgrade or click on the buy credits link in the left sidebar and purchase some non-expiring credits.
How To Link a Feedback Form to A Review Request
You can use smart links to automatically inject the feedback form link into your email review requests. To do this follow the below steps:
- Go to get more reviews in the top navigation menu
- Click on request reviews (left sidebar)
- Click edit on your email campaign
- Inside the email editor click on an element that you want to link or highlight the text you want to link
- Click Special Links and in the dropdown select feedback form and then select the feedback form you want to link to
- Click save
Note: You can also follow the same process if you want to automatically select a specific rating when a link is clicked.
How To Protect Against Negative Feedback
Sometimes negative reviews are unavoidable. However, there are a few things you can do to prevent negative reviews.
Many times, negative reviews are a result of a misunderstanding or miscommunication. By providing a way for customers to contact you directly you can prevent negative reviews.
In this guide we will show you how to setup a private feedback form when the system detects an unhappy customer.
Getting more positive reviews
By creating a feedback form you can get more positive reviews. This is because the system will automatically detect happy customers and ask them to leave a review. This will increase your overall review volume and help you get more positive reviews.
- Click on get more reviews in the top navigation
- Click on feedback forms (left sidebar)
- Click the create form button
- Give your form a name
- Click next
- In the feedback form builder on the right, you will see the live preview of your form as you make changes
- If you select 1-3 stars the form will automatically ask the customer for feedback
- If you select 4-5 stars the form will automatically ask the customer to leave a review
- You can disable this under the settings tab by unchecking the “Stop negative feedback” option
- You can also adjust what we treat as a positive or negative review under the settings tab by adjusting the “Catch Negative Feedback Below” option
- Once you are happy with your form click save
- Click share your form button to get installation steps and the hosted URL for the feedback form.
What happens when a customer leaves negative feedback?
When a customer leaves negative feedback they will be presented with a private feedback form. This form will allow them to contact you directly and prevent them from leaving a negative review. This will give you a chance to resolve the issue and turn a negative experience into a positive one.
The private feedback will be sent to you via email and will also be available in the platform. You can then respond to the customer directly and resolve the issue.
Is this against review site guidelines?
No, this is not against review site guidelines. In fact, many review sites encourage businesses to resolve issues with customers directly. This is because it helps to improve the overall customer experience and prevents negative reviews.
We don’t stop customers from leaving a review we simply provide them with a way to contact you directly. This is a win-win for both you and the customer. If the customer still wants to leave a review they can do so by clicking the link at the bottom of the private feedback form.
How To Send Email Review Request Reminders
Sometimes customers won’t leave a review on the first review request. Let’s face it life get’s in the way for everyone and it is the same for your customers. This is why we support the ability to setup review request reminders so that you can nudge your customers to leave a review based on your defined rules.
Note: Before setting up reminders make sure you have setup an email template that you want to use for reminders.
To get started with email review request reminders follow the below steps:
- Click on get more reviews in the top navigation menu
- Go to request reviews (left sidebar)
- Click edit on your email campaign
- Click on the reminders tab
- Click add reminder
- Fill in the information within the popup
- Click add
What happens if a customer leaves a review?
Our system automatically tracks this so when we detect that your customer clicked on the feedback form link within the email, we automatically stop sending out review requests.
How To Send Emails from My Own Domain
By default, all email review requests are sent from our email address. If you would like to send emails from your own domain then follow the below steps. Please make sure you have access to your DNS service provider for the domain before getting started.
Step 1: Adding Your Domain
- Go to get more reviews in the top navigation menu
- Click on the email settings link (left sidebar)
- Add your domain (excluding www.) i.e. mydomain.com
- Click save
- Follow the verification steps on the page carefully.
- Once you have copied all the DNS settings to your DNS service provider click the verify button. If everything was copied correctly you will get green checkmarks on each record to confirm this.
Having Issues?
If you are sure the DNS settings have been copied correctly then you may need to wait a few minutes to an hour so your DNS service provider can update the records across the internet.
Step 2: Adding Your Email Address
Once you have completed step 1 follow the below steps to add your email address to the review request campaign.
- Click on the review requests link (left sidebar)
- Click edit on the email campaign that you wish to add your email address to
- Click on the settings tab
- Scroll down to the sender section and add your email address to the from email field
- Also add your email address to the reply-to email address field. This can be the same or a different email address. Any email replies from your customers will be forwarded to that address.
- You may also fill in the from name and reply-to name fields
- Click save
Step 3: Send Test Email
Great! Now we just want to test that everything is working correctly. Follow the below steps to send a test email.
- Click on the content tab
- Scroll down to the bottom and click on save and send test button
- Type in the email address you would like the test email to be sent to
- Check your inbox and confirm the email is correct and the address information matches your configured domain.
How To Send SMS Review Request Reminders
Sometimes customers won’t leave a review on the first review request. Let’s face it life gets in the way for everyone and it is the same for your customers. This is why we support the ability to setup review request reminders so that you can nudge your customers to leave a review based on your defined rules.
To get started with SMS review request reminders follow the below steps:
- Click on get more reviews in the top navigation menu
- Go to request reviews (left sidebar)
- Click on the SMS tab
- Click edit on your SMS campaign
- Click on the reminders tab
- Click add reminder
- Fill in the information within the popup
- Click add
What happens if a customer leaves a review?
Our system automatically tracks this so when we detect that your customer clicked on the feedback form link within the SMS, we automatically stop sending out review requests.
Importing Free Email Templates
You can easily import ready-made templates for free from the Unlayer marketplace. To get started follow the below steps:
- Go to get more reviews in the top navigation menu
- Click on email templates (left sidebar)
- Click create template
- Give your template a name
- Click the import Unlayer template button at the bottom of the email editor
- Open a new browser tab and go to https://unlayer.com/templates
- Search for a template you like and copy the full URL for the template you would like to import
- Go back to the platform and paste the copied URL into Unlayer template field
- Click import
Opt-in Before Sending the Review Request
If you would like to get your customers to opt-in before sending review requests then you can follow the below steps:
- Go to the get more reviews link in the top navigation
- Click on request reviews link (left sidebar)
- Click edit on the campaign
- Go to the opt-in tab
- Click the view opt-in form button
- This will open a new tab with your opt-in form, you can use this URL to send to your customers or team
Note: The opt-in form can be used by customers or employees to opt-in to receive review requests. You can optionally enable authentication and adjust the form to your liking.
Review Requests Not Being Sent
If you are having issues with review requests not being sent out you should first check the logs on the campaign to make sure it is not an issue with lack of credits or a mistake with the campaign.
Accessing the campaign logs
- Go to get more reviews in the top navigation
- Click request reviews (left sidebar)
- Click logs button on the campaign that you are having issues with
- Use the search option to find the email that did not get the review request
- Check the status and message (if any)
- If the status is failed and the message says “Not enough credits” then you need to purchase additional credits or upgrade your plan
If you are still having issues after checking the logs please raise this with your support rep.
Schedule Review Requests Between Time Range
Review requests by default are scheduled to be sent between 9am to 6pm UTC but this can be adjusted to your requirements. Follow the below steps to adjust the review request schedule:
- Go to get more reviews in the top navigation
- Click on request reviews
- Click edit on the campaign you would like to adjust the schedule on
- Click on the settings tab
- Under the schedule section adjust the times for “Send emails between these times”
- Click save
Note: All times are currently in UTC
Upload Customer Lists to A Campaign
You can bulk upload a list of customers to send review requests to. To get started follow the below steps:
- Go to get more reviews in the top navigation menu
- Click on request reviews (left sidebar)
- Click edit on the campaign you would like to import reviews to
- Go to the customer’s tab
- Click on the dropdown arrow next to the add customer button
- Click import customers
- Upload a CSV file with at least the email address and/or mobile number that you would like to send the review to (if using SMS)
- Follow the onscreen instructions to map the columns from the CSV to the system correctly
- Click import
What Are Deep Links?
Deep links are links that take you directly to a specific page within an app. For example, if you click on a deep link to leave a review on Google, it will take you directly to that business page within the Google Maps app instead of Google Maps in your browser.
Why Are Deep Links Important?
On mobile devices customers are more likely to leave a review on a native app than a mobile browser. This is because customers are already logged into the app and it is a more seamless experience. Our platform supports deep links automatically and you can try these yourself by checking out your feedback forms.
What happens if a customer doesn’t have the app installed?
If a customer doesn’t have the app installed our system will automatically redirect them to the mobile browser version of the review source. This is a seamless experience for the customer and they will not notice the difference.
Can I disable deep links?
Yes, you can disable deep links by going to the feedback form and unchecking the “Deep links” option under the distribution tab.
How to respond to reviews
Learn how to respond to reviews directly from your dashboard. And use the power of AI to automatically respond to reviews.
Handling Private Feedback
Feedback forms are a powerful way to reduce the chances of negative reviews impacting your online reputation. Whenever unhappy customers try to leave a negative review, our system detects this and redirects the customer to leave private feedback. In this guide we will go over how you can manage your private feedback within the platform.
What happens when private feedback is left?
When a customer leaves private feedback, we will automatically email the specified email address with the feedback. It will include the customers details so you can respond to the compliant.
Accessing private feedback via the system
Private feedback is also visible inside the system. Follow the below steps to access this data:
- Go to get more reviews in the top navigation menu
- Click private feedback (left sidebar)
- Here you will see all the private feedback for the business
Reply To Reviews With AI
You can reply to reviews automatically with our built-in AI. Follow the below steps to get started.
Responding to reviews
- Go to reviews in the top navigation menu
- Click the respond on the review you would like to reply to
- Click the autogenerate link
- Click the generate link
- In the generated reply field, the automated response will be shown
- If you are happy with the response, click respond or edit the reply and click respond once happy
Did you know?
You can provide a custom prompt to suggest how the reply should be formed.
Replying To Facebook Reviews
When you have used Facebook sign in to connect your review profile to the system you can reply to your Facebook reviews directly inside the platform. Follow the below steps to get started.
Responding to reviews
- Go to reviews in the top navigation menu
- Click the respond on the review you would like to reply to
- In the reply text field type in your response and click respond
Did you know?
You can use the autogenerate option on the reply text field and the system will automatically generate a response to the review!
Replying To Google Reviews
When you have used Google sign in to connect your review profile to the system you can reply to your Google reviews directly inside the platform. Follow the below steps to get started.
Responding to reviews
- Go to reviews in the top navigation menu
- Click the respond on the review you would like to reply to
- In the reply text field type in your response and click respond
Did you know?
You can use the autogenerate option on the reply text field and the system will automatically generate a response to the review!
Managing notifications
Keeping on top of your reviews is important, learn how to use notifications and be alerted when you receive a review or private feedback.
Managing New Review Notifications
By default, when the system detects new reviews, we will automatically send an email to your registered email address. You can manage when and what email addresses we notify by following the below steps.
Managing new review notifications
- Go to settings in the top navigation menu
- Click on notifications (left sidebar)
- Edit on the new review notification
Adjusting what triggers a notification
If you want to be only notified on specific reviews you can adjust this by scrolling down to the update rules section. You can adjust the rating scale that triggers a notification and what sources you would like to be notified on.
What type of notifications are supported?
Right now we support email and Slack notifications.
Managing Private Feedback Notifications
Whenever we prevent a negative review from being left on one of your public review sites the customer will leave private feedback. This feedback is a chance to resolve the issue with the customer before they leave a negative review.
It is important to deal with these issues as quickly as possible. We automatically send this feedback to your registered email address. If you would like to change or add additional email addresses you can follow the below steps.
How to manage private feedback notifications:
- Click on settings in the top navigation menu
- Go to notifications (left sidebar)
- Click edit on the private feedback notification
- Scroll down to the update emails section
- Adjust the email addresses that should get notified when private feedback is left
- Click save
Managing your account
Learn how to manage your account, change your password, and more.
Credit Usage
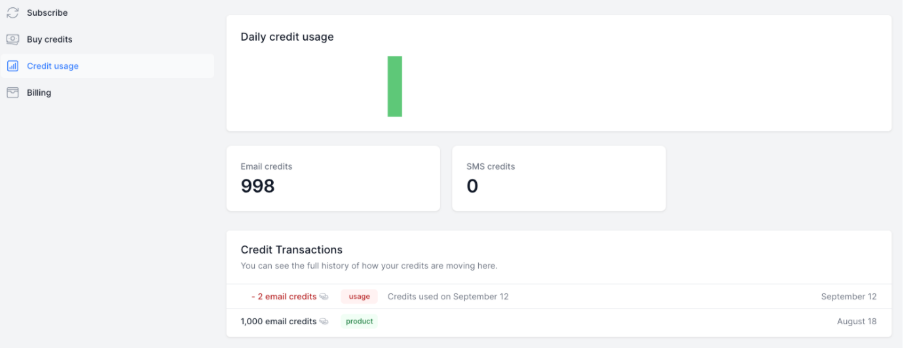
Email Credits
When sending out review requests for each email sent we deduct 1 email credit from your account. You can view your credit balance and more details about how your credits are being used by following the below steps:
- Click on settings in the top navigation
- Click on credits (left sidebar)
- You will now see your credit usage overtime and the total credits remaining
SMS Credits
When sending out review requests for each SMS sent, we deduct 1 SMS credit from your account. You can view your credit balance and more details about how your credits are being used by following the below steps:
- Click on settings in the top navigation
- Click on credits (left sidebar)
- You will now see your credit usage overtime and the total credits remaining
Note: 1 message equals 160 characters going over this character limit will incur additional credit charges as mobile networks will send out multiple messages.
Purchasing Additional Credits
If you need additional credits then what your plan supports you can either upgrade or click on the buy credits link in the left sidebar and purchase some non-expiring credits.
How To Change Your Password
You can change your current password by following the below steps:
- Go to settings in the top navigation menu
- Click on profile (left sidebar)
- Scroll down to the update password section
- Type in your current password and your new password (the new password must be at least 8 characters)
- Click save
How To Setup 2FA
2FA adds another authentication step to your account when you login to the system. Before getting started making sure you have installed the Google Authenticator app on your mobile.
Enable 2FA
To enable 2FA follow the below steps:
- Click on settings in the top navigation
- Click on profile (left sidebar)
- Scroll down to the Two Factor Authentication section
- Click enable
- Type in your password
- Scan the QR code with your authenticator app
- Store the recovery codes in a safe place
Disable 2FA
To disable 2FA follow the below steps:
- Click on settings in the top navigation
- Click on profile (left sidebar)
- Scroll down to the Two Factor Authentication section
- Click disable
See Who Is Logged into Your Account
You can manage your logged in sessions by following the below steps:
- Go to settings in the top navigation menu
- Click on profile (left sidebar)
- Scroll down to the browser sessions section
- Here you will be able to see what devices are currently logged into your account
- You may optionally log out all other browser sessions apart from your current device
If you think your password may have been compromised then we recommend resetting your password.
Invite your team
Learn how to add your team and manage their permissions.
How To Invite Your Team
You can add your team to your account to help manage your business reviews. In this guide we will go over the steps to invite your team.
Adding team member
- Click on settings in the top navigation menu
- Go to organizations (left sidebar)
- Click the members button on the organization
- Type in the email address of the person you would like to invite
- Select the role for the new user
- Click add
- An email will be sent to the user to setup an account